14.8.2019

Updated:

6.5.2021

8 min read

Share on:

In this series, we follow a Christchurch couple in their bid to turn their 1960’s fixer-upper, from a retro rental to a modern home.

If you’ve ever considered buying an older home but have lacked the confidence to tackle something totally outdated, this guide is for you. It’s a whole lot of fun, and not as hard (or anywhere near as risky) as you might imagine.

In the previous chapter, we learned about the process of house hunting, deciding on a budget and evaluating what’s on offer.

In this chapter, we look at how Jeremy & Alana create and refine their vision for the house they purchased. Creating a set of practical jobs, that could be communicated clearly to various tradespeople to complete.

Where did the inspiration come from? And how can you come up with your own?

So, house is purchased and now in your possession. What’s next?

After several month’s of searching, bidding, putting in offers and generally attempting to find the ‘perfect’ home, Jeremy and Alana have settled, on a more or less original, 1960’s Summerhill stone home to be the subject of their ‘buy to renovate’ dream. With great bones, no earthquake damage apart from minor cosmetic plaster cracking and a quiet, sunny setting – it’s time for work to begin!

  • Being from a project-management background, we knew that we had to have a clear destination, or goal, for our renovation. We called this our ‘mission statement’, and whenever it came to making a decision, we referred back to it for guidance.

    The mission statement we came up with was:

    “An uncomplicated renovation to transform our house into a warm, peaceful home. Easy to live in. Clean and simple finishes. On-time (10 weeks) and on budget ($75k)”

    It’s an aspiration, although it sounds a bit geeky. The point was, when we had to make a decision on the fly, we could discuss the various options and decide on the option which best fitted our mission statement.

    It guided our renovation plan. It was easy to get lured into doing more than our budget or time constraints could handle through every stage of the planning. It was also easy to get seduced by the vast range of product options, and things easily became complicated. Referring back to our mission statement was something we did through every stage, and we found it vital.

Where did the inspiration come from?

With a substantial cache of carefully selected magazine pages and lovingly curated Pinterest boards; and enough compromise under their belts to inspire world peace; Jeremy and Alana now have the job of applying that inspiration to their house. The aim, to come up with a set of specific tasks ready to hand over to tradespeople.

  • Reflected in our mission statement, we wanted it to be peaceful, calm space. We wanted our home to be a place we can retreat to relax and be centered. For us, that meant neutral colours and keeping spaces uncluttered and clear. We preferred to add interest via natural elements, texture and art, rather than bold colours.

    Of course, this took some compromising and discussion. We picked up many ideas visiting open homes. We found that seeing what works in a real-life setting was easier to envision outright.

    When we disagreed on something, for example, one of us liked the idea of books on display in a bookshelf, while the other preferred they could be shut away – we ‘parked’ the decision. We looked for common ground and worked on those decisions first. Once we had a few decisions parked, and a lot of common ground decided, we revisited the points of disagreement. A lot of those potentially tenuous decisions were sorted easily because the ‘right’ direction was clear based on the rest of the project direction. The remainder came down to good old fashioned compromise.

    We used Pinterest to layout ideas but really valued a physical inspiration board. Old magazines, interestingly, were more helpful than current ones. We wanted a timeless style. By looking at magazines across time, we could weed out the trends and focus on lasting looks. By avoiding stand-out trendy elements in our big-ticket items, we knew we could achieve a classic style. A style that we’d be happy with for many years, and one that wouldn’t blow our budget.

    The process of gathering inspiration started well before purchase. Years ago, in fact. After purchasing the home came the challenge of how to apply our inspiration to the actual house in question. A lot of ideas weren’t relevant – but that was OK. We had a good feel for what we wanted, and that was the important bit.

How did you apply your inspiration to this actual house?

With a substantial cache of carefully selected magazine pages and lovingly curated Pinterest boards; and enough compromise under their belts to inspire world peace; Jeremy and Alana now have the job of applying that inspiration to their house. The aim, to come up with a set of specific tasks ready to hand over to tradespeople.

  • Applying the inspiration to the house was a stage of the renovation we really enjoyed!

    With our mission statement in the forefronts of our minds, we set about listing the changes we would make. Of course, we never intended this to be our ‘final cut’, we just needed a direction to kick things off. We anticipated that as we met with builders and other tradespeople interested in undertaking our work, we would ‘fill in the blanks’.

    We wanted an open-plan, warm home, with modern comforts. We both like to cook, and love the classic ‘kitchen as the heart of the home’ feel, so creating a large, central and streamlined kitchen was important.

    To achieve this, for starters, we would need to:

    • Remove a section of the internal wall between kitchen and living room
    • Move the hot water cylinder out of the living room (to the ceiling if it worked)
    • Install cavity sliders where a couple of internal doors were intrusive
    • Close up a couple of external doors (one that went from the driveway to the kitchen, that didn’t work; and another that would end up being right next to a sliding door)
    • Throw out the existing kitchen
    • Replace existing timber single glazing with aluminium double glazing
  • We wanted the whole living space to feel like it opened up straight into the garden. We earmarked two large windows for replacement with triple stacker sliding doors- creating that indoor-outdoor flow.

    White walls and cabinets would create an open feel. To complement the white, we decided on a black oven and hood which would work in well with the existing black fireplace. We would carry this theme throughout the house to the all-white bathroom and the white-walled bedrooms – also accented with new black aluminium joinery.

    There were a few other issues that we wanted to solve:

    • The shower door conflicted with the bathroom door, so we wanted to replace the bathroom door with a cavity slider
    • There was some cosmetic cracking from the earthquake in the bedrooms, which we wanted fixing.

    Adding natural elements like a fine stone-effect countertop and warm-toned wooden floors in the kitchen and bathroom would add to the minimalist-yet-comfortable theme. We were thinking a dark grey carpet in the living room and bedrooms, as it was a warm, neutral colour – and would do a good job of hiding dog hair!

    As the sleepout was relatively new, it didn’t require much other than painting. The garage door, guttering and joinery there was a vibrant 80’s era green. To save on costs, we would investigate having them painted black (to match the house) rather than replaced.

With the loose plan outlined, what was the next step?

  • Before contacting any tradespeople, we wanted to make sure we could achieve our general plan for our budget. We didn’t want to waste anyone’s time with unattainable plans.

    We researched products, compared costs and checked if consents would be needed. We were satisfied our general plan would be attainable.

    Our research also involved gaining an understanding of which trade takes care of what jobs. Understanding this was important because we wanted to discuss various options with the right people when the time came.

    We quickly realised that the builder would be the primary contact. For a typical renovation (like ours), the builder is the central trade, which other trades revolve around. The timeline and details would need to be planned with the builder first and foremost, and everything else would centre around that.

    From here, with our research in mind, the next step would be to make contact with a builder to lay out a more detailed plan trade-by-trade.

Lessons learned when gathering & applying inspiration

  • Set an aspirational ‘mission statement’ that reflects the goal, or destination for your renovation. You can always come back to this when making a tough decision.

  • Pick up ideas from anywhere and everywhere. Open homes can be a great source of inspiration as well as magazines and of course, online. Build on a theme that fits your taste and requirements.

  • When two or more people are developing ideas together for a renovation – it always pays to search for common ground. Build on this and see where the common ground takes you – rather than sweating the aspects you can’t agree on.

  • Using your mission statement and inspiration – begin developing a list of things you want to improve or change. Start with the most obvious and important first.

  • Spend time researching your list of changes – the type of tradespeople who you will likely need, and the general cost of products.

  • If you’re struggling with your vision, you can always hire a renovation consultant, interior designer, architect or other specialist to breathe ideas into your reno. Ask if you can pay by the hour, and get them around for a brainstorming session. There are also project managers available who can take care of as much as you don’t want to do.

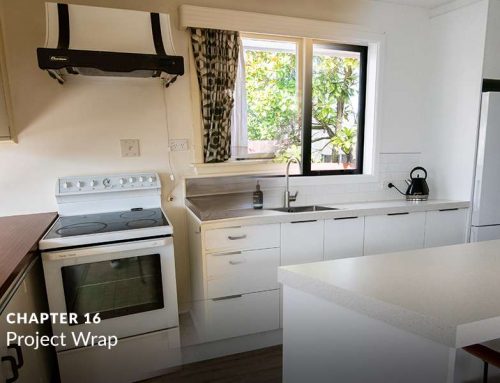
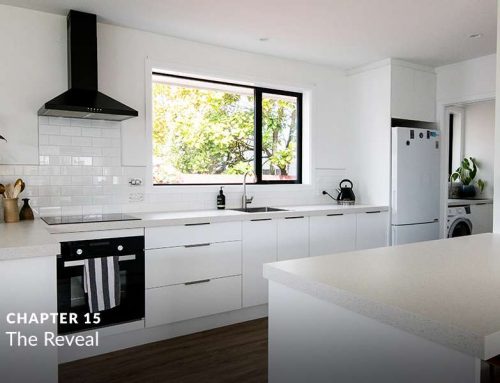
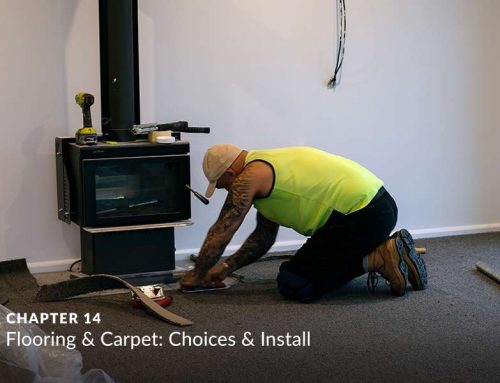
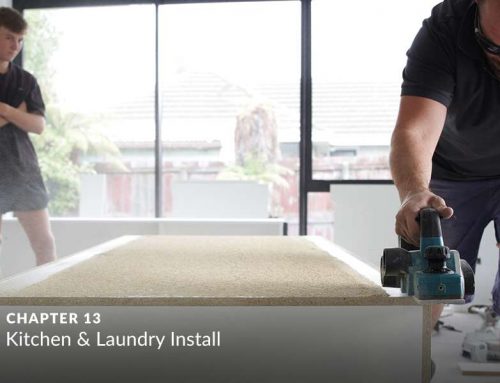
Gallery (click to enlarge)

Keep reading: